Major Refit of La Vita, Part 2 - The Mast
Thursday, October 14, 2021
“Nothing in the world is worth having or worth doing unless it means effort, pain, difficulty… I have never in my life envied a human being who led an easy life. I have envied a great many people who led difficult lives and led them well.”
― Theodore Roosevelt
Teddy would have certainly envied our lives over the past year as we worked to get this new mast finished. We knew it would involve lots of careful planning and hard work, but we did not anticipate how COVID-19 would influence so much of the project. From supply chain problems to lack of personnel and the marine industry being so busy, it has certainly been a challenge. But now, as we leave Baltimore and head south for the winter, it is starting to feel worth the effort. After all, all’s well that ends well. And we apologize for how long the post is, but it does cover basically a year of our lives and the largest, most expensive project we have ever undertaken on La Vita.
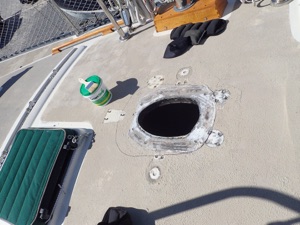
We ordered the new mast in October 2020 and arrived at Cobb’s Marina the first of April, 2021 to start the installation. But it wasn’t as simple as pulling out an old mast and sticking a new one in. The mast goes through the top of the cabin and is anchored to the keel of a boat, it is said to be “keel stepped”. This is versus a “deck stepped” mast that mounts to the deck and does not go through the cabin top. Keel stepped masts are thought to be much stronger installations. But our new mast had a different shape than the old one so Selden sent us a deck collar to mount and the existing hole had to be modified to accommodate the larger hole.
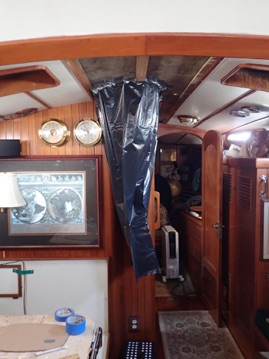
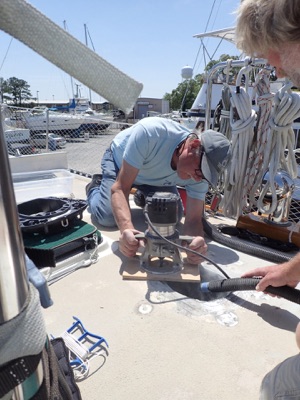
We often say that every successful project starts when you have to buy a new tool and this was no exception. We had to wait a couple of days for Larry to receive a diamond-tipped router bit to cut through the thick fiberglass on our cabin top. While we waited, we prepared a dust catcher for down below and the deck cutting went well. Or as well as could be expected when cutting a hole in our roof.
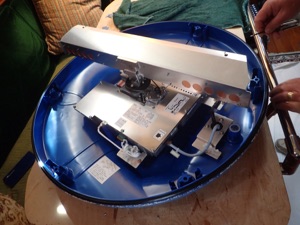
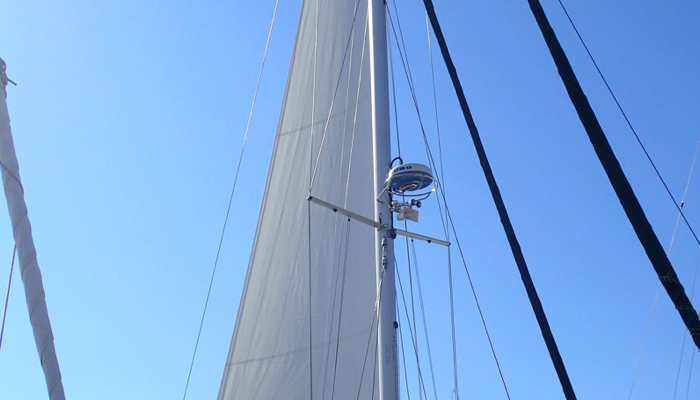
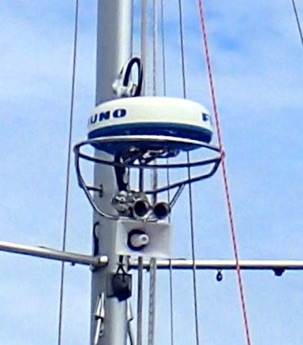
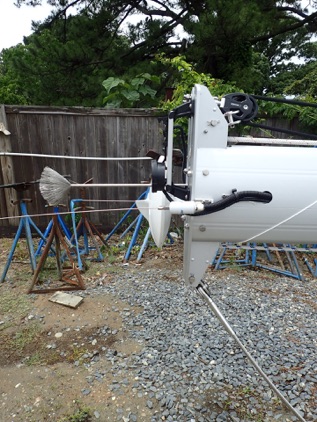
Our Furuno radar was only ten years old so we decided to transfer it to the new mast instead of buying a new radar. We took it apart down below to see if any repairs needed to be made but it looked very clean inside.
We also transferred our existing radar guard ring from the old mast, but it required some modification on the mounting feet due to the shape of the new mast.
Howdy Bailey took it away to his shop and brought it back a few days later, ready to mount to the new mast. He also welded a shelf underneath it for the PA speaker and Drew’s new horns.
I forgot to take a picture of the completed radar assembly on the ground, but this is what it looks like on the mast.
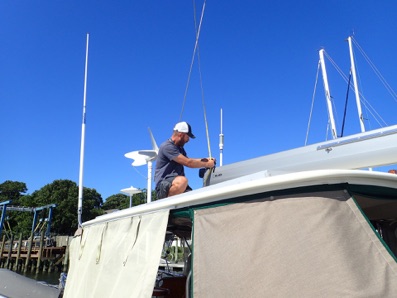
Selden had run wire, at our request, to the top of the mast for a VHF antenna and messenger lines to pull cables for the TV antenna, wind instrument and anchor light. We purchased these over the winter and mounted them, along with an ion dissipator. The manufacturer says the ion dissipator keeps static electricity from building up and makes a mast less likely to be hit by lightning. A lot of people say they don’t work but we figured that for $100, why not?
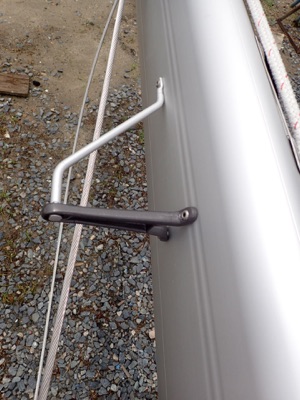
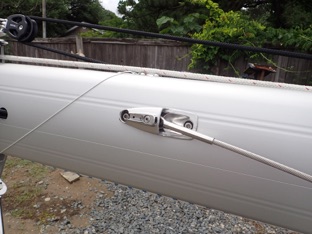
We bought a block and a new spinnaker halyard for the front of the mast and got that ready. We also ordered two mast steps from Selden and mounted them near the top of the mast so if one of us is working up there, we can stand up in the steps while in the boson’s chair.
Some people run mast steps all the way up the mast so they can climb themselves while someone tails their safety line from the deck. We decided not to do this because of the potential for getting lines caught around the steps and the difficulty in climbing the front of the mast because of having to work around the radar (we can’t climb the back of the mast because that is the cavity where the sail furls and you don’t want a bunch of rivets rubbing on the sail and causing chafing. But having two at the top of the mast for doing work there will be nice since sitting in the boson’s chair for a long period of time can cause your legs to fall asleep.
And still our riggers had not shown up to do anything on our mast. We saw them around the yard and they checked in with us once in awhile. Mike even complimented Drew on what good work he was doing and they were open to answering questions, but it was becoming apparent to us that
if we wanted to get this mast in the boat this summer, we would be doing all the prep work. So we opened the wire rigging box on a palate that Selden sent with the mast and starting running the shrouds (these are stainless steel twisted wires that connect to the chain plates on the deck and hold up the mast).
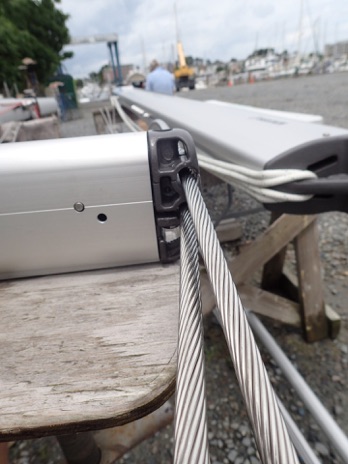
The shrouds were quite substantial, well labeled and easy to install. We found that the biggest challenge was keeping the shiny new wire out of the mud.
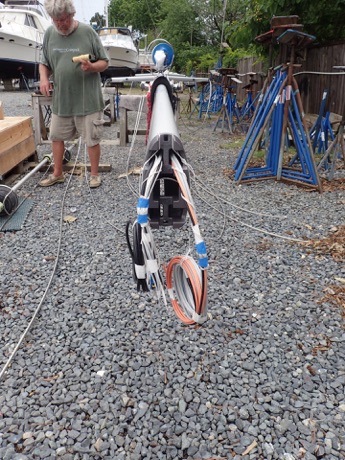
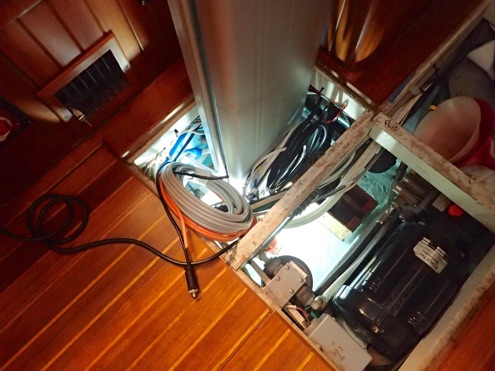
Next we tackled the wiring that came out of the bottom of the mast. When the mast was put into the boat, all these wires had to be easy to move out of the way so they would not be crushed and be labeled so we could hook up the wiring in the boat for the radar, lights, horns and antennas.
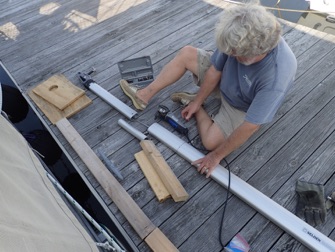
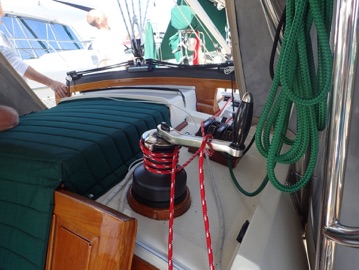
We also put on the winch pads, mounted our two Anderson winches that we took off the old mast and all the cleats for the halyards (line that pulls the sails up the mast). Selden had included stainless pop rivets and we had a large pop rivet gun so although this took time and effort, it was not hard.
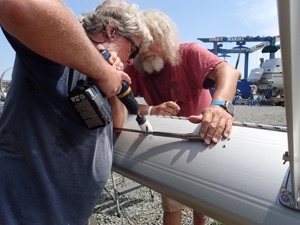
On the front of the mast we mounted a track for the whisker pole car. Drew had to drill and tap 32 holes to mount the track. At one point, the riggers and another of their clients came over to see what he was doing and had conversation all around him while he worked.
We talked about whether we should force the issue with our rigger, but we were getting the mast we wanted because we did all the work. No cutting corners, no one else’s ideas forced on us. And we were saving money since the rigger wouldn’t be making as much in labor.
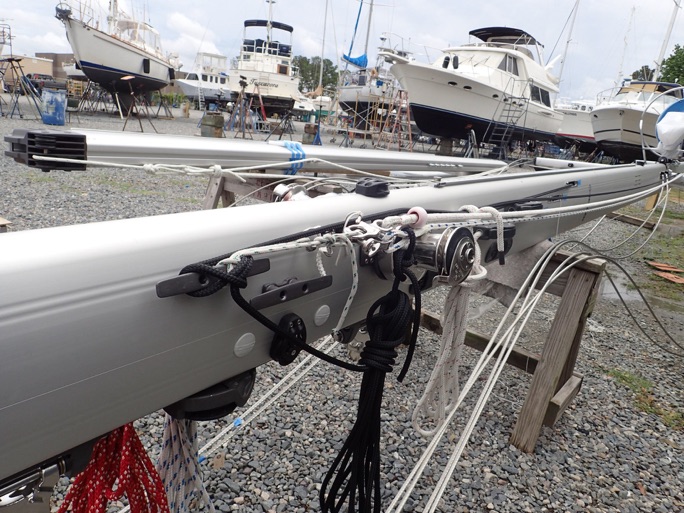

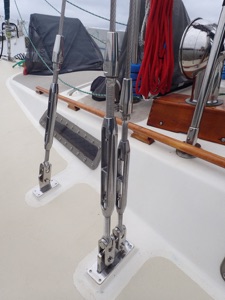
We did insist the rigger help us with one of the shrouds. Selden had included upper intermediate stays as we had requested to balance the loads driven by the staysail when used as a storm sail. But they had not put the fitting in the mast to connect them. So Mike got the fittings from Selden and, after some problem and delay finding the right size metric hole saw, helped Drew drill the holes on each side of the mast and mount the fittings. He knew some tricks for holding the fitting in place while it was pop riveted from the outside.
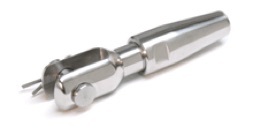
The mast was almost ready! The riggers made a date with the yard to use the crane and put the mast back in the boat and then ......... the rigger told us, a month after the mast had been delivered to Cobb’s Marina, that he did not have all the Hi-Mod fittings needed to attach the shrouds to the deck fittings. In fact, he was missing four essential ones out of the 13 required. There are other types of compression fittings that could be used, but we had specified Hi-Mod fittings from the very beginning and we weren’t backing down now.
Some people might say that this is when karma kicked in for us. All the times we could have been jerks but weren’t, all the times we could have fussed, screamed and yelled and we didn’t, we got a payback from the rigging universe. Drew called a company we have done business with for years, RiggingOnly, in Connecticut and “yes, they had all four fittings we needed” and would ship them overnight delivery. Two of the Hi-Mod fittings were the last two of that size they had in stock. Turns out that even though Hayn Enterprises distributes the Hi-Mod compression fittings exclusively in the US, the fittings are actually manufactured by Petersen Stainless in the UK, a country hard hit by COVID19 and whose factory was shut down for an extended period of time.
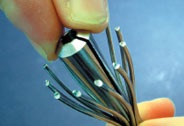
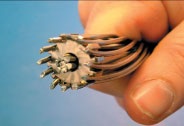
This is why we like Hayn fittings so much. First you cut the shroud 1x19 stainless wire to length, unwind a little bit at the end and put each strand in a special notched fitting. Then treat with a Loctite primer and special Loctite and put together.
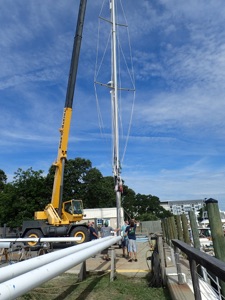
The date for installing the mast was reset and we moved La Vita back to the spot along the wall where the crane worked.
It was basically a reverse from removing the mast two months earlier. They tied a line to the mast and lifted it with the crane, moved the mast over to La Vita and slowly lowered it through the new deck ring into the boat.

Since Loctite is basically a specialized adhesive, the fittings are glued together. This way water can run through the fitting, not collect inside it. Other fittings require using caulking to keep the strands in place and the caulking can collect water and cause rust and metal failure.
After the mast was set into the new fitting that we mounted on the keel plate, David Duvall rode the crane up to remove the rope they had tied and install our B&G wind instrument at the top of the mast. Best to leave it off when the mast
is being stepped as it could get tangled in the crane line and broken.
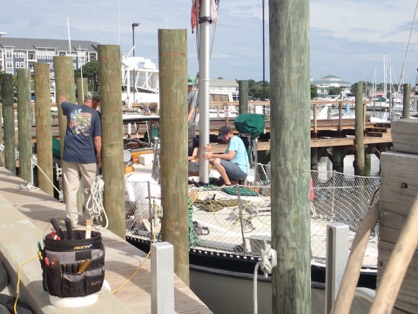
This is when our riggers really came through for us. They attached 11 of the 13 shrouds with the Hayn fittings and used rope to stabilize the mast for the two forestays. That way we could move the boat back to our slip. Then they brought down the two roller furling forestays, put them on the mast and connected their Hayn fittings.
It was a long and hot day, but very productive. After the riggers left, Cobb’s people brought down the boom and helped us get it on the boat and connected. Then we went to work on the wiring for the mast instruments and lights. Everything except the horn was on the old mast, so the mass of wires protruding from the bottom of the mast was quickly connected. And EVERYTHING WORKED!!!!!
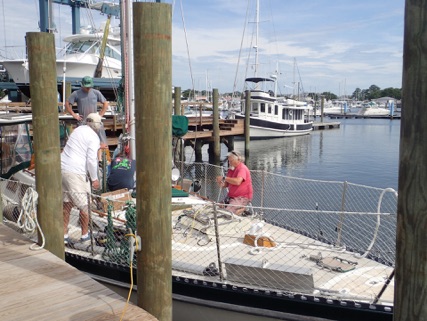
The riggers returned in a couple of days to “tune” the rig. This means all shrouds were tensioned carefully so they were supporting the mast but not bending it in any way. One of the riggers was quite good at this and since we had never had the rig professionally tuned after we started replacing shrouds ourselves, we were glad he was there to do that.
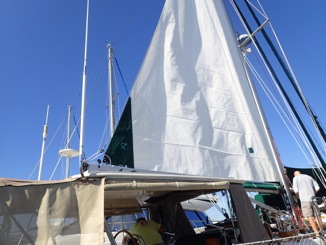
It was finally time, 2-1/2 months after we arrived at Cobb’s, to have Evan from the local Quantum Sails loft come measure for our new furling mainsail. It was important to us to have the mainsail measured by Quantum because the tolerances between where the boom sat above the hard top and solar panels was very small. If the sail was too tall, there was potential for lots of damage if the boom hit the hard top and solar panels.
September before it arrived. It was hot in Norfolk now; spring had changed to summer. And while we were able to complete several more projects (which will be described in Part 3 of the refit saga), we were ready for a change. Cobb’s had been so good to find room for us as our mast project drug on, but they were out of space after 9/1. That worked fine for us and we decided to go back to the Anchorage Marina in Baltimore. The Anchorage, like last year in the summer of hiding from COVID-19, offers great access to food, marine parts, restaurants and wine without having to rent a car and at an excellent price. And the mainsail could be delivered to the Quantum Annapolis loft and installed by them.
Our trip up Chesapeake Bay was uneventful, even though it was hot, and we arrived in Baltimore on 8/31. This year, the Anchorage was back to hosting breakfast on Saturdays and a band at the pool on Saturday evenings. We were pleasantly surprised at how everyone in this area of Baltimore continued to embrace social distancing and mask wearing to help protect each other and the unvaccinated.
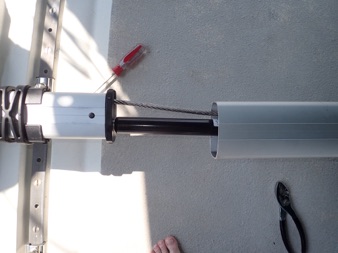
One last thing to do before the mainsail was delivered would be to shorten the rigid vang (called a rodkicker). In years past, we had used a block and rope vang to hold the boom down when at the slip and going to weather. This was our first rigid vang. Selden ships their rodkickers in a few set sizes and most need to be shortened for individual rigs. We played with the rodkicker for a few days, determined that we needed to cut off 11” for optimal lift. The lift is supplied by a gas cylinder inside the rodkicker so that had to be taken out and the metal rope stayed inside the rodkicker so we couldn’t just slice through the tube. Luckily there were some YouTube videos showing how to replace the gas cylinder and some level of instruction from Selden to help us. I think Selden expected the
rigger to shorten the rodkicker, not the customer. But we knew we could do as good as or better work than they could so we got out the Dremel Ultra Circular Saw, measured carefully and fixed the rodkicker length. No problem for us -- we have now learned lots of new rigging skills.
One might ask, why did we have a professional rigger when we did most of the work. First, Selden does not sell directly to individuals, only to riggers. And while we had hoped for more help on their end, we are happy with the way the mast turned out and we saved quite a bit of money by doing the work ourselves. Also, the riggers were very good at connecting the Hayn fittings to the shrouds and getting the mast tuned and supplying three low-stretch halyards with Class 2 double braid splices.
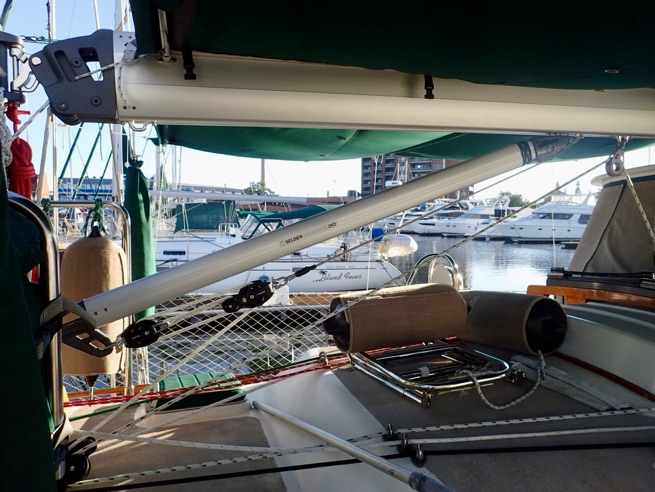
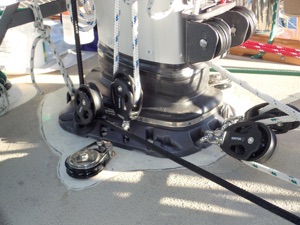
The deck ring, with all of its blocks leading lines back to the cockpit is quite massive compared to the old Isomat and we are still getting used to some of the new features, but we wouldn’t fully be able to appreciate what we had now until the mainsail came in.
As with everything on this project, there was a delay on getting the sail ordered and there were labor and material shortages in Sri Lanka, where the sail was made. It would be at least mid-
Quantum Sails kept us informed of the continuing delays at the sail loft in Sri Lanka. It turns out Quantum sews a large block in the clew of their furling mainsails to help it furl and unfurl smoothly. There were ten mainsails in Sri Lanka that were finished except for those blocks and ours was one of them. The blocks were in a FedEx container in Hong Kong and FedEx didn’t have staff to fly the container to Sri Lanka. But as soon as they did, the sails would be finished and shipped.
Finally we got a call from Quantum Sails that the sails had shipped and would be arriving the following week in Annapolis. Quantum Annapolis arranged to bring the sail to us in Baltimore the following week. So on September 30, 2021, not quite a full year since we ordered the mast, we finally received the final piece!
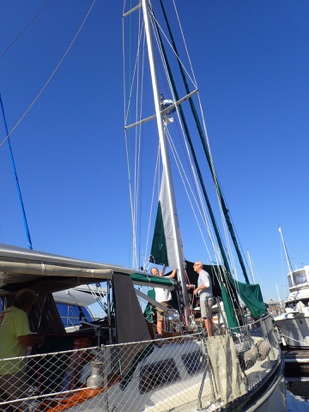
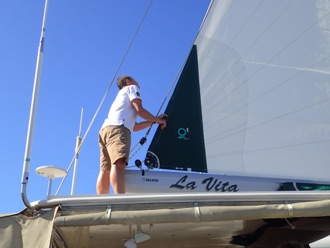
After a bit of a struggle getting the main halyard swivel attached to the head of the sail, they hoisted it up the mast and Charley climbed up on the hard top to attach the outhaul to the clew of the sail.
It fit perfectly! The wind was on the nose and light, not always something you can arrange in the slip. We sheeted the sail in, as if we were sailing close hauled, and the spacing of the boom over the hard top and solar panels was exactly what we wanted. Evan at Quantum Norfolk did an excellent job of measurement
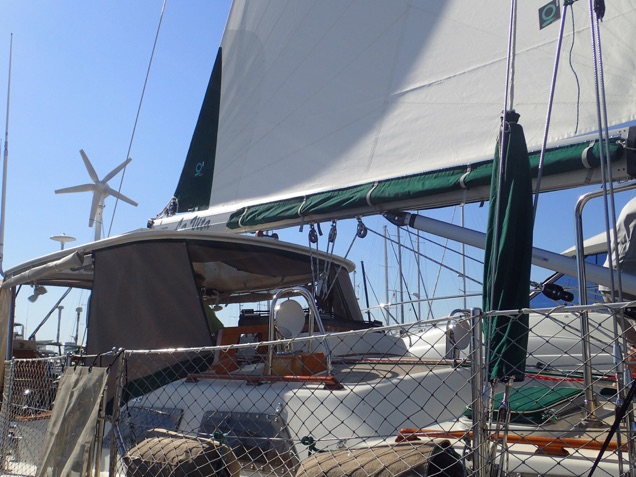
The mainsail furls inside the mast using a furler similar to the ones on the jib and staysail. The main’s furling line is a continuous loop, with both ends coming into the cockpit. Our riggers in Norfolk had spliced this line or us before we left Cobb’s.
The main continuous furling line goes to the starboard winch deck, where we have a powered winch. So furling is easy -- you just put the line on the winch and push a button in the cockpit. This is what all this work has been for. We rolled the sail in and out of the mast a few times, just to make sure it flowed easily.
Tonight was a night for celebration! Of course there was one minor glitch -- the sail loft had not added the Tayana logo on the sail as we had asked. But Quantum took care of that the next week. They picked up the sail in the morning, added the logo, and brought the sail back in the late afternoon.
But now, after only six short weeks, it was time to leave Baltimore and head south. We have a haul out at Cobb’s scheduled on 10/18 to replace our engine coupling and an insurance survey on 10/19. As with all things marine right now, it was difficult to get on the surveyor’s schedule so we don’t want to miss it. So back we go, down Chesapeake Bay, and then on to Brunswick GA for a few months.
Thanks for your patience in this long post. We have one more refit post, about painting decks, rebuilding a windlass, adding dorade guards and various other things but that can wait for a couple of weeks.